Quantcast
Channel: Data Services and Data Quality
Viewing all 236 articles
Browse latest View live

SAP Data Services on LINUX

$
0
0

This article is about operating SAP Data Services on LINUX. This article is relevant/more/ helpful for those who are first timer on LINUX.


As we have seen lots of stuff on SAP Data Services on Windows, however we have very little information available on Administration of Data Services on LINUX Operating system.


Since SAP Data Services XI 4.0 there is a lot from Administration Perspective. Lots of Administration tasks are moved from Management Console to Central Management Console. But there are still some points which needs your Linux skills if Data Services Server is sitting on Linux. This becomes more important if you are particularly looking from support perspective.


Since SAP has announced HANA and every thing in SAP is being available on HANA (Powered by HANA) like ECC on HANA, BW on HANA and HANA as Native, then Data Services is being used as ETL tool to load data into HANA. SAP HANA certified Data Services as the only tool which can load data into HANA.


All the HANA appliance and software uses LINUX/UNIX kind of operating system and hence Data Services is also being installed on LINUX/UNIX.(this is not the primary reason, but yes it is one of the main reason from the security, cost, and maintenance perspective)


Now it becomes extremely important that Data Services guy should know basic Linux and know how to operate/maintain that product in Linux.


Again, since the XI 4.0  release, SAP is trying to draw a line between SAP DataServices development, Administration and Build Management.


This is good and it bring more transparency in the process and become easier to assign roles. SAP has greatly improved the security of SAP Data Services and have more control on objects in terms of roles and authorizations. (So its also important to understand the administration from BOE/IPS)


Well the series of article on "Data Services with Linux"  is focusing on Administration of Data Services from Operating system perspective


This article will server a base document to access all the Information available on SAP Data Services with LINUX/UNIX.


This article is written using SAP Data Services XI 4.1 SP02.


Following are the article that has step by step instructions to work with Data Services on LINUX.


Data Services on Linux - Version check of Data Services Components


How to Add Local Repo with Data Services Job Server in LINUX


How to Start/Stop Data services Server on LINUX


This space will be continuously updated.


Let the database do the hard work! Better performance in SAP Data Services thanks to full SQL-Pushdown

$
0
0

SAP Data Services (DS) provides connections to data sources and targets of different categories. It supports a wide range of relational database types (HANA, Sybase IQ, Sybase ASE, SQL Anywhere, DB2, Microsoft SQL Server, Teradata, Oracle…). It can also read and write data into files (text, Excel, XML), adapters (WebServices, salesforce.com) and applications (SAP, BW et al.). Typically, to enable transformations during an ETL process, non-database data are temporarily stored (staged, cached) in databases, too. When interfacing with relational databases, DS generates SQL-statements for selecting, inserting, updating and deleting data records.


When processing database data, DS can leverage the power of the database engine. That may be very important for performance reasons. The  mechanism applied is called SQL-Pushdown: (part of) the transformation logic is pushed downed to the database in the form of generated SQL statements. That is because, although DS itself is a very powerful tool, databases are often able to process data much faster. On top of that, internal processing within the database layer avoids or significantly reduces costly time-consuming data transfers between database server memory and DS memory and vice versa.


In many cases, the DS engine is smart enough to take the right decisions at this level. But it is obvious that a good dataflow (DF) design will help. The overall principle should consist in minimizing processing capacity and memory usage by the DS engine. In fact, following are the most important factors influencing the performance of a DS dataflow:


  • Maximize the number of operations that can be performed by the database
  • Minimize the number of records processed by the DS engine
  • Minimize the number of columns processed by the DS engine ( a bit less important, because often with lower impact)


During development of a DS dataflow, it is always possible to view the code as it will be executed by the DS engine at runtime. More in particular, when reading from a relational database, one can always see the SQL that will be generated from the dataflow. When a dataflow is open in the DS Designer, select Validation à Display Optimized SQL… from the menu:


1.png


Figure 1: Display Optimised SQL


It will show the SQL code that will be generated and pushed down by the DS engine:

2.png


Figure 2: Optimised SQL


Make sure that the dataflow has not been modified after it has last been saved to the repository. If the dataflow is modified, it must be saved before displaying the generated SQL. The Optimized SQL popup window will always show the code corresponding to the saved version and not to the one displayed in DS Designer.


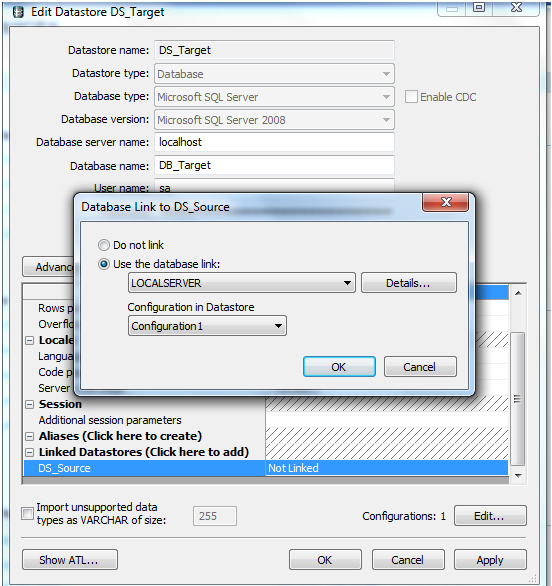
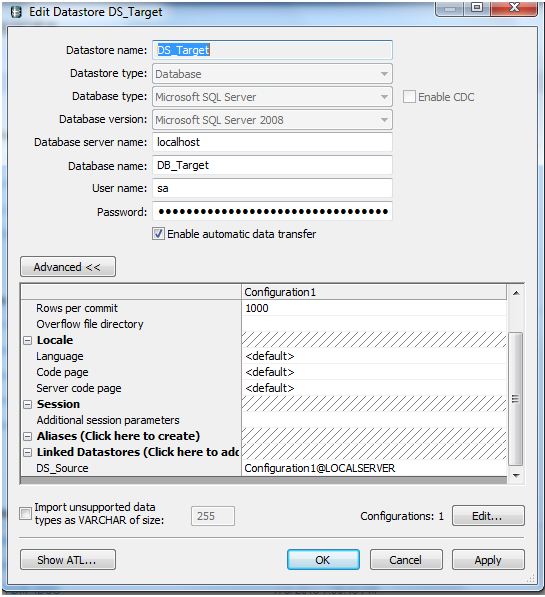
When all sources and targets in a flow are relational database tables, the complete operation will be pushed to the database under following conditions:


  • All tables exist in the same database, or in linked databases.
  • The dataflow contains Query transforms only. (Bear with me! In a next blog I will describe some powerful new features.  When connected to HANA, DS 4.2 is able to push down additional transforms such as Validation, Merge and Table_Comparison.)
  • For every DS function used there’s an equivalent function at database level. This has to be true for any implicitly generated functions, too. For instance, when data types of source and target columns are different, DS will include a conversion function, for which possibly no equivalent function exists at database level! There are no substitution parameters in the where-clause (replace them by global variables if necessary).
  • Bulk loading (cf. below) is not enabled.
  • The source sets are distinct for every target.


This functionality is commonly called full SQL-Pushdown. Without any doubt, a full pushdown often gives best performance, because the generated code will completely bypass any operations to DS memory. As a matter of fact that constitutes the best possible application of the main principle to let the database do the hard work!


Don’t bother applying the performance improvements described here, if your applications are already performing well. If that’s the case, you can stop reading here .


Don’t fix if it’s not broken. Check the overall performance of your job. Concentrate on the few dataflows that take most of the processing time. Then try and apply the tips and tricks outlined below on those.


1.   Pushdown_sql function


DS functions for which there is no database equivalent (or DS does not know it!) prevent the SQL-Pushdown. Check out the AL_FUNCINFO table in the DS repository to find out about which DS functions can be pushed down:


SELECT NAME,FUNC_DBNAME FROM AL_FUNCINFO   where SOURCE = ‘<your_database_type>’


3a.png

3b.png


Figure 3: DS does not know equivalent database function


There is a solution though when the culprit function is used in the where-clause of a Query transform. Using the DS built-in pushdown_sql function this code can be isolated from DS processing and pushed down to the database so that the complete statement can be executed at database level again.


4a.png

4b.png


Figure 4: Use of sql_pushdown


2.   Use global variables


There is not always a database equivalent for all DS date functions. As a result the function is not pushed down to the database.


5a.png

5b.png


Figure 5: Date function – no pushdown


Whenever a system timestamp or a derivation thereof (current year, previous month, today…) is needed in a mapping or a where-clause of a Query transform, use a global variable instead. Initialize the variable; give it the desired value in a script before the dataflow. Then use it in the mapping. The database will treat the value as a constant that will be pushed to the database.


6a.png

6b.png

6c.png


Figure 6: Use of a global variable


3.   Single target table


Best practice is to have one single target table only in a dataflow.

7a.png

7b.png


Figure 7: Single target table


For an extract dataflow that always means a single driving table, eventually in combination with one or more lookup sources. For transform, load and aggregate flows, the columns of the target table are typically sourced from multiple tables that have to be included as sources in the dataflow.


By definition, a full SQL-Pushdown cannot be achieved when there’s more than one target table sharing some of the source tables. With multiple target tables it is impossible to generate a single SQL insert statement with a sub-select clause.

8a.png

8b.png


Figure 8: More than one target table


Whenever the dataflow functionality requires multiple target table, adding a Data_Transfer transform (with transfer_type = Table) between the Query transform and the target tables might help in solving performance issues. The full table scan (followed by further DS processing and database insert operations) is now replaced by three inserts (with sub-select) that are completely pushed down to the database.


9.png


Figure 9: Data_Transfer transform

10a.png

10b.png

10c.png

10d.png


Figure 10: Data_Transfer Table type


4.   Avoid auto-joins


When multiple data streams are flowing out of a single source table, DS is not able to generate the most optimal SQL code. To that extent, best practice is to include additional copies of the source table in the flow.

11a.png

11b.png


Figure 11: Auto-join


When designing the flow as shown below, DS will generate a full SQL-Pushdown.


12a.png

12b.png


Figure 12: Without auto-join


5.   Another application of the Data_Transfer transform


When joining  a source table with a Query transform (e.g. containing a distinct-clause or a group by) DS does not generate a full pushdown.


13a.png13b.png

Figure 13: Sub-optimal DS dataflow


An obvious correction to that problem consists in removing the leftmost Query transform from the dataflow by including its column mappings in the Join.


When that’s not possible, the Data_Transfer transform may bring the solution. By using a Data_Transfer transform, with transfer_type = Table, between the two Query transforms, performance may be significantly improved. For the dataflow below, DS will generate 2 full pushdown SQL statements. The first will insert the Query results into a temporary table. The second will insert the Join results into the target.

14a.png

14bc.png


Figure 14: Optimization with Data_Transfer transform


6.   The Validation transform


In a non-HANA environment, when using transforms different from the Query transform, processing control will pass to the DS engine preventing it from generating a full pushdown. There exists a workaround for validation transforms, though.


15.png


Figure 15: Validation transform


Replacing the Validation by two or more Query transforms, each with one of the validation conditions in its where clause will allow DS to generate a (separate) insert with sub-select for every data stream.


16.png


Figure 16: Parallel queries

Data Services on Linux - Start/Stop Services

$
0
0
This article is relevant if you like to Start/Stop Information Platform services on Linux box.

This article is about operating SAP Data Services on LINUX. This article is relevant/more/ helpful for those who are first timer on LINUX.

This article is written using SAP Services XI 4.1 SP02.


Pls note that this is different from the Start/Stop Data Services Job Server on Linux, which is one of the component of Data Services.

For your reference : - How to Start/Stop Data services Server on LINUX


        This article covers the step by step instructions(with screens wherever its possible) to Start/Stop IPS (information Platform Services) on Linux using Linux Shell Prompt.


Pls note that start/stop IPS services/servers can be done via central Management Console as well. This article does not cover that part of it.

It is always useful to know linux commands to start/stop SIA(server intelligence agent), because restart of all the servers can be dobe graphically but stopping all the servers and starting them after a while can not be achieved graphically means using CMC.

Following are the commands that needs to be performed at LINUX command prompt.

-$ cd /usr/sap/<SID>/businessobjects/sap_bobj

-$ ./ccm.sh -cms servername.unix.domain.com:6400 -username Administrator -password password -authentication secEnterprise

-$ ./ccm.sh -start all

-$./ccm.sh -cms servername.unix.domain.com:6400 -username Administrator -password password -authentication secEnterprise -display


Pls see below for step by step instructions to start/stop IPS Servers.


Step 1:- Login Via Putty,


Input :- Provide hostname


Hit Open.


Type the below command to navigate to the IPS directory where BOE/IPS is installed.

-$ cd /usr/sap/<SID>/businessobjects/sap_bobj

Now, it is possible that you do not have proper privileges to perform below action so pls ensure that you logged in via some sudo access which has authorization to perform below command, generally it is sapds<SID>. it may be different as well.


-$ ./ccm.sh -display -cms Servername.unix.domain.com:6400

Creating session manager...

Logging onto CMS...

err: Error:  Could not log on to CMS (STU00152)

err: Error description: The system Servername.unix.domain.com can be contacted, but there is no Central Management Server running at port 6400.


So logged in with right user and make sure that it has sudo assigned to to it.


Below command will help you to open an authenticated session so that you can perform your activities.


Here we are interested to start all the server components of IPS

-$ ./ccm.sh -cms servername.unix.domain.com:6400 -username Administrator -password password -authentication secEnterprise
-$ ./ccm.sh -start all
Starting all servers...

Starting servername3...

After executing above command you can make sure that all the components are running by using below command. there you need to provide one more parameter to display the components running under that instance (-display)

$ ./ccm.sh -cms servername.unix.marksandspencercate.com:6400 -username Administrator -password password -authentication secEnterprise -display
Creating session manager...
Logging onto CMS...
Creating infostore...
Sending query to get all server objects on the local machine...
Checking server status...

Server Name: servername.CentralManagementServer
     State: Running
     Enabled: Enabled
     Host Name:servername
     PID: 2781
     Description: Central Management Server

Server Name: servername.AdaptiveProcessingServer
     State: Running
     Enabled: Enabled
     Host Name: servername
     PID: 2988
     Description: Adaptive Processing Server

Server Name: servername.OutputFileRepository
     State: Running
     Enabled: Enabled
     Host Name: servername
     PID: 3002
     Description: Output File Repository Server

Server Name: servername.InputFileRepository
     State: Running
     Enabled: Enabled
     Host Name: servername
     PID: 2998
     Description: Input File Repository Server

Server Name: servername.AdaptiveJobServer
     State: Running
     Enabled: Enabled
     Host Name: servername
     PID: 2995
     Description: Adaptive Job Server

Server Name: servername11.CentralManagementServer
     State: Stopped
     Enabled: Enabled
     Host Name:servername
     PID: -
     Description: Central Management Server

Server Name: servername11.AdaptiveProcessingServer
     State: Stopped
     Enabled: Enabled
     Host Name: servername
     PID: -
     Description: Adaptive Processing Server

Server Name: servername11.OutputFileRepository
    State: Stopped
     Enabled: Enabled
     Host Name: servername
     PID: -
     Description: Output File Repository Server

Server Name: servername11.InputFileRepository
     State: Stopped
     Enabled: Enabled
     Host Name: servername
     PID: -
     Description: Input File Repository Server

Server Name: servername11.AdaptiveJobServer
     State: Stopped
     Enabled: Enabled
     Host Name: servername
     PID: -
     Description: Adaptive Job Server

Server Name: servername.EIMAdaptiveProcessingServer
     State: Running
     Enabled: Enabled
     Host Name: servername
     PID: 2992
     Description: EIM Adaptive Processing Server

Server Name: servername11.EIMAdaptiveProcessingServer
     State: Stopped
     Enabled: Enabled
     Host Name: servername
     PID: -
     Description: EIM Adaptive Processing Server                     


In the above output you see that some of the servers are still stopped. This is because I have presented the example of Pre-prod environment where two machines are part of a cluster/Server group because of high availability and performance reasons.


As I have executed the command on one node only, that's why servers from other node are seeing as "Stopped". I will do the similar exercise on other node too.


Now. I will login into CMC and see the server status.


As All servers were stopped so I could not logged into CMC and check the severs. Now both the nodes are up and I am able to logged into the CMC.


CMC >> HOME >> Organize >> Servers


DS_IPS_SERVER_START_STOP_01.JPG


Check all the other status as well, to make sure that there is nothing disabled and stopped.


So lets check the Stopped instances/servers. Click on "Stopped" under "Server Status"


DS_IPS_SERVER_START_STOP_02.JPG


Lets check the "others" under "Server Status"


DS_IPS_SERVER_START_STOP_03.JPG


Now we are confident and say confirm that all the servers are up and running.


Next step is to login to Data Services Designer and check that you are able to login without any difficulty.


DS_IPS_SERVER_START_STOP_04.JPG


1. If you are interested to perform some other server Management (Data Services Application, Job Server) then you may see this article


How to Start/Stop Data services Server on LINUX


Data Services on Linux - Version check of Data Services Components


How to Add Local Repo with Data Services Job Server in LINUX


SAP Data Services on LINUX

Data Services 4.2 Workbench

$
0
0

A while ago I posted about the new Data Services 4.2 features. The post can be found here Data Services 4.2 What's New Overview


There is obviously several new features. But one of the new features that SAP will add more and more features to with each release will be the workbench.


In Data Services 4.1 the workbench was first released but had limited functionality. I posted about 4,1 workbench in Data Services Workbench Part 1 and Data Services Workbench Part 2 .


In 4.2 SAP has extended the Workbench functionality. This blog will focus more on the new functionality.


One of the biggest changes would be that you can now design the dataflow in the workbench, the first release did not have this functionality yet. In comparison with Data Services Designer the concept is to be able to do most of the dataflow in one window. So in this version when you click on the query transform all the mapping will be shown in the below windows. This is illustrated in Figure 1 below.

DS 4.2 Eclipse.jpg

Figure 1


Unfortunately not all transforms are available yet in the workbench. Figure shows the transforms that are available in the workbench with this version.

DS 4.2 Transforms.jpg

Figure 2


Nice little feature I noticed was that when you click on a column it shows the path of where that column came from. This could be very handy for complex dataflows.

DS 4.3.jpg

Figure 3


As shown in figure 4, you can now go to advanced editor when doing your mappings if needed. The functions have been also arranged in a similar manner as in Information Steward.

DS 4.2 Functions.jpg

Figure 4


The workbench makes us of projects still. However in the workbench the projects shows everything related. So in the below example it shows the Data Store called STSSouthEastDemo, also shows two dataflows. Can also create folders to arrange contentDS 4.2 Project Explorer.jpg

Figure 5


As shown in figure 6 below the log is slightly different, shown in a table, but still shows the same info.


DS 4.2 Log.jpg

Figure 6


In Data Services you have always been able to view the data. But now that the workbench is using the eclipse based shell in we can then view data as other eclipsed based sap products. Figure 7 illustrates this. You will notice this has same look as feel as hana studio and as IDT. This unfortunately doesnt allow you to view two tables of data next to each other like, a feature that is available in the designer and is useful.

DS 4.2 DisplayData.jpg

Figure 7


So I have shown you some of the new features in the workbench. Many of them being the replication of the Data Services Designer but into the eclipse look and feel, in some instances some new little features or end user experience improvements.


But I'm still missing a lot before I will switch from the Designer to the workbench.


Here is a list of what is missing

  • No workflows, so cant link multiple dataflows to make one workflow.
  • No Jobs. Every dataflow is basically creates a job in the background. So limits how many dataflows and workflows you can string together.
  • No debug, break point options
  • No scripts yet
  • Not all the transforms are available yet
  • No cobol support, excel or xml yet


For more information follow me on twitter @louisdegouveia

SAP BW source to oracle data warehousing using SAP Data Services

$
0
0

Hi,


I am new for data warehousing project. Experts please help me to clarify the below points. I need to achieve this by using SAP Business object Data Services 4.2


* My source is SAP ECC , target is Oracle data warehousing


* Data will be loading on daily basis( delta loading)  to oracle data warehousing.


* I need to schedule the job to load on daily basis.


* SAP BW  datastore configuration


* Oracle  datastore configuration ( Do i need to enable CDC )


* How to develop SAP BODS job ( Ex : Extraction, de-duplication,validation, enrich, loading) - bods job development approach


Kindly share the document . If possible please share sample atl file for the above requirement


Thanks

Selvam

System Configuration in Management Console

$
0
0

Hi


System configurations doesn't appear in Management Console, can anyone suggest on this, how can i get that.


i have attached the screenshot of the Management console.


Regards,

Vikesh Juneja

Update on Data Services connection with BW 7.3 and Higher

$
0
0

This Blog Post will help people in the process of BI Upgrade and as well in establishing connection between Data Service &  BW 7.3 (and higher).


Will try to explain the entire blog in comparison with BW 7.0.


In order to establish a connection between Data Services and BI 7.0, we used to create the Data Services RFC connection under External Source System Tab of BI  7.0 System. Once created the connection used to look like below:


External System.jpg


If  BI 7.0 system is upgraded into BW 7.3 or higher version then the external system connection will break. So as a part of Post Upgrade, the BASIS team will take care of the activation of all the Source Systems.


But in some scenarios the Flat File Source Systems and External Source Systems will remain inactive. In these scenarios, you need to test the connection and activate manually if necessary.


After upgrade from BI 7.0 to BW 7.3/higher you will notice a New Folder "Data Services" under Source Systems Tab. Until this point the Data Services Connection is still under External System.


after upgrade.jpg


Now check the connection parameters of Data Service System under External System. The screen shot below displays the connection parameter option


connection param.jpg


If the connection test will fail then you need to activate the Data Services External Source System. In the process of activation It will prompt you to Save the Changes. Select "Yes' for the changes, now it will activate the connection.


Notice the below screen shot, after the activation the connection will not be available under External Source System.


The connection will be automatically moved in to the Newly Created Data Services Folder in BW 7.3 & higher.


FINAL.jpg


Due to the tight integration between SAP and BOBJ tools these things are possible. Apart from the folder like Data Services, in the background the connection API's are also been upgraded which will help in better performance going forward.


If you need the complete information of establishing connection between DS & BW, please take a look into my previous blog.


Step by Step for establishing RFC Connection between SAP-BW & Data Service


Hope this will help.


Thanks & Regards

Shankar Chintada

How to create a new HANA ODBC DSN entry for SAP Data Services on Unix Platforms

$
0
0

This blog describes how to use SAP Data Services 4.1/4.2 Connection Manager on UNIX to create  a new  ODBC DSN data source  for Hana db.


The following configuration steps have been performed on:

  • SAP Data Servers (SDS) 4.2 SP1
  • SUSE Linux Enterprise Server 11 (x86_64) VERSION = 11 PATCHLEVEL = 2
  • HANA DB 1.0 SP7
  • Windows Server 2008 R2 as Client


A: Checks to perform before adding the new DSN entry:


  1. On the SDS job server machine, make sure Hana db client is installed and its version matches that of the Hana server.
  2. Test the database connectivity using the native hana db client driver:
    • cd to the Hana client install directory ie: cd /usr/sap/hdbclient
    • Execute:  ./hdbsql -n hana_servername:port -u username -p password
    • Run a simple command “ \s” for status check, and if no error produced  exit and   proceed.
    • Good test results should look like the figure below:

Capture1.PNG


   3. Set the SDS environment variables:


$ cd $LINK_DIR/bin       (<LINK_DIR> is the SDS installation directory).
$ . ./al_env.sh                (there is a space between the dots)


   4. Verify the location of the odbc.ini file where the DSN entry will be added. The $ODBCINI would have been set by the above script ./al_env.sh


echo $ODBCINI  (The output should be:  <$LINK_DIR>/DataDirect/odbc/odbc.ini)


B: Add a new DSN Entry


  1. cd $LINK_DIR/bin
    Run ./DSConnectionManager.sh and select "1" to configure Data Sources. All existing DSN entries should also be displayed:

capture2.png

    2.  Add a new database source and select SAP HANA:

Capture3.png

  3. Enter the DSN name,  Hana server details  and logon values:

Capture4.png

  4.  After a successful test new HANA DSN entry should be displayed:

Capture5.PNG

  5. Run: view $ODBCINI to confirm the new "[HANA DSN 1]" entry in the odbc.ini:

Capture6.png

  6.  Test the odbc connectivity from the same server by issuing this command from hanadb client path :

./odbcreg DSNNAME  username password


For example: ./odbcreg 'HANA DSN 1' username  password


Successful test result should look like this:

Capture7.PNG


C: Add DSN and SDS Data Store on Windows client


   1. On the Windows SDS designer client machine, install Hana db client,  with the same version as the server.

   2. Create a new DSN source, using ODBC Data Source Administrator:

capture9.PNG

capture8.PNG

capture.10PNG.png


  3. In SDS Designer create a new Data Store:

capture.11.png


That's it! Please let me know if you have any questions


Nawfal Tazi


How to create a Database links in Data Services using SQL Server

$
0
0

Sometimes you need to use multiple databases in a project where source tables may be stored into a database and target tables into another database. The drawback of using two different databases in BODS is that you cannot perform full pushdown operation in dataflow which may slow down the job execution and create performance issue. To overcome this we can create a database link and achieve full push down operation. Here is step by step procedure to create a database link in BODS using SQL Server on your local machine.

Pre-Requisite to create a database Link:
  1. You should have two different datastores created in your Local repository which are connected to two different databases in SQL Server (Ex: Local Server).
    Note: You may have these databases on a single server or two different servers.It is up to you.
  2. These two different databases shall exits in your Local SQL Server.
How to create a Database Links:
Step 1: Create two databases named DB_Source and DB_Target in your Local SQL Server.
SQL Server Code to create databases. (Execute this in your query browser)
CREATE Database DB_Source;

CREATE Database DB_Target;
Step2: Create two datastores in your local repository named DS_Source and connect this to DB_Source database. Create another datastore named DS_Target and connect this to DB_Target database.
Now, I want to link DS_Target datastore with DS_Source datastore so that it behaves as a single datastore in data services.
Use below details in screenshot to create your Datastores:


a) Create DS_Source Datastore as shown under


b) Create DS_Target Datastore as shown under


Before we go for third step lets create a Job and see what will happen without using a database link when we use the tables from these datastores in a dataflow. Will it perform full pushdown?


Step 3:

Follow the below screen shot to create your Project, Job and Dataflow in Designer.


Now go to your Sql Server database and open a query browser and use the below sql code to create a table with some data in DB_Source database.

a)

--Create a Sample Table in SQL Server
Create table EMP_Details(EmpID int identity, Name nvarchar(255));
--Inserting some sample records
Insert into EMP_Details values (1, 'Mohd Shahanshah Ansari');
Insert into EMP_Details values (2, 'Kailash Singh');
Insert into EMP_Details values (3, 'John');.
b) Once table is created import this table EMP_Details into your DS_Sourcedatastore.


c) Drag a table from the datastore in your dataflow and use it as source table. Use a query transform then drag a template table and fill it the data as shown in the screen shot below. So, you are creating a target table int DS_Target datastore.


Once target table created your dataflow will look as under.


d) Map the columns in Q_Map transform as under.


Now you have source table coming from one database i.e. DB_Source and Target table is stored into another database i.e. DB_Target. Let’s see if the dataflow is performing full pushdown or not.


How to see whether full pushdown is happening or not?


Go to Validation Tab in your designer and select Display Optimized SQL…. Option. Below is the screen shot for the same.


Below window will pop up once you select above option.


If optimized SQL Code is starting from Select Clause that means Full pushdown is NOT performing. To perform the full pushdown your SQL Query has to start with Insert Command.


Step 4:
How to Create a Linked Server in SQL Server


Now go to SQL Server Database and Create a linked Server as shown in the screen below.

Fill the details as shown in the screen below for General Tab
Now, go to Security tab choose the option as shown in below dialog box.

Click on OK Button. Your link server is created successfully.


Step 5:
Now It is time to create a datastore link and then see what optimized SQL it will generate.


Go to advance mode of your DS_Target datastore property and Click on Linked Datastore and choose ‘DS_Source’ Datastore from the list and then click OK Button.


Below dialog box will appear. Choose Datastore as DS_Source and click Ok.


Then Click on the browser button as shown below.


Then, select the option as show in dialog box below and then Click OK button.


Now you have successfully established a database link between two datastores i.e. between DS_Source and DS_Target.


Now Save the BODS Job and check the Optimized SQL from Validation Tab as done earlier.


Go to the dataflow and see what code is generated in Optimized SQL.


Below optimized code will be shown.


You can see that SQL has insert command now which means full pushdown is happening for your dataflow.

This is the way we can create a database link in SQL Server and use more than one datastores in a dataflow and still perform full pushdown operation.
Hope this helps.

Dynamic File Splitting using SAP Data Services

$
0
0

There might be a requirement where you need to split bulk table data into several files for loading further into other systems. Instead of creating single file and executing the job several times, in Data Services we can automate this process to split the files dynamically based on no of files and records required.


So lets assume we have a table T1 contains 10 Million records and we are required to split into 10,000 chunks each.


Overview of dynamic file splitting process


1) Adda new column to the table and populate with sequential numbers. This will be used to identify the chunks of records.

2) Create a script to declare and initialize variables for file count(ex 50),records count(ex 10000) etc.

3) Create a WHILE loop to run for no of times as many files are required.

4) Create a new DF inside the loop to split the records and push to file format.

5) Create a post processing script to increment the variable values.


Sample working demo of this process is shown in this video.

How to create Alphanumeric Group Counters in DS

$
0
0

You might have come across a scenario where you need to create more than 99 group counters for a particular group. Taking the instance of Task List Object in PM. Task List object has three important tabs and those are Header, Operation and Operation Maint. Package. Header has a field called group counter which is of max two digits length in SAP which means it can’t exceed 99. So if your group counter is less than or equal to 99 then two digit numbers is ideal to use as group counter. But this may not be always the case. What in case you have more than 99 group counters for a group? In that case we have no other option left but to generate an alphanumeric group counter.


How to generate Alphanumeric Group Counters:


There could be many ways and logic of generating the alphanumeric group counters. I would here in this post illustrate one of the simplest and easiest ways of doing it. Since two chars is the limitation for Task List group counter, let’s create two digit alphanumeric GC to cope up with the current requirement of more than 99 group counters. We can take the combination of two alphabets. We have 26 alphabets in English so the no. of combination we can generate for group counters is 26*26=676.  I am assuming that your group counter won’t go beyond 676. SAP recommendation is maximum 99 group counters for each group.


Steps to create the Group Counters:


1.      Create the header, operation and Maint. Package in task list as usual but in case of group counter instead of generating a 2 digit number for group counter generate three digit numbers using gen_row_num_by_group(Group_Name) function. Group counters are generated for each group separately.


2.      Create a lookup table (Permanent Table) to map numeric group counters to its alphanumeric group counters. Your lookup will have alphanumeric group counters like AA, AB, AC, AD, ….AX, BA, BB, BC,..BX…CA, CB....,CX......and so on. This lookup table shall contain all the possible combination which are 676 in total.


3.      In dataflow for Header, Operation and Maint. Package add a query transform at the end to use lookup_ext() function. This function will map the three digit group counters to its alphanumeric group counters.


Your lookup function for a group counter field in query transform will look like this:


lookup_ext([DS_SEC_GEN.DBO.MAP_GROUP_COUNTER,'PRE_LOAD_CACHE','MAX'], [CHAR_GROUP_COUNTER],[NULL],[GROUP_COUNTER,'=',Query_6_1_1_1.Group_Counter]) SET ("run_as_separate_process"='no', "output_cols_info"='')

Transfer data to SAP system using RFC from SAP Data Services

$
0
0

This just an sample to demonstrate data transfer to SAP systems using RFC from Data Services.


To server the purpose of this blog, I am going to transfer data to SAP BW system from Data Services.


Sometimes we may need to load some lookup or reference data into SAP BW system from external sources.

Instead of creating a data source, this method will directly push data to the database table using RFC.

Below, will explain the steps that I used to test the sample.


1) Create a transparent table in SE11.

1.png

2) Create a function module in SE37 with import and export parameters.

2.png

3.png

3) The source code for the FM goes below.

FUNCTION ZBODS_DATE.
*"----------------------------------------------------------------------
*"*"Local Interface:
*"  IMPORTING
*"     VALUE(I_DATE) TYPE  CHAR10
*"     VALUE(I_FLAG) TYPE  CHAR10
*"  EXPORTING
*"     VALUE(E_STATUS) TYPE  CHAR2
*"----------------------------------------------------------------------

data: wa type zlk_date.

if not I_DATE is INITIAL.
clear wa.
CALL FUNCTION 'CONVERT_DATE_TO_INTERNAL'
EXPORTING
DATE_EXTERNAL                  = i_date
* ACCEPT_INITIAL_DATE            =
IMPORTING
DATE_INTERNAL                  = wa-l_date
*     EXCEPTIONS
*       DATE_EXTERNAL_IS_INVALID       = 1
*       OTHERS                         = 2
.
IF SY-SUBRC <> 0.
* Implement suitable error handling here
ENDIF.

wa-flag = i_flag.
insert zlk_date from wa.
if sy-subrc ne 0.
update zlk_date from wa.
endif.

e_status = 'S'.
endif.

ENDFUNCTION.


4) Remember to set the attribute of the FM to RFC enabled, otherwise it will not be accessible from Data Services.

4.png

5)  Make sure both the custom table and function module are activated in the system.

6) Login to DS Designer,Create new data store of type "SAP APPLICATION" using required details.

7) In the Object library, you will see an option for Functions.Right click on it and choose "Import By Name".Provide the Function module name you just created in the BW system.

8.png

8) Now, build the job with source data, a query transform and an output table to store the result of function call.

5.png

9) Open the query transform editor, do not add any columns, right click and choose "New Function Call".

10) The imported function will be available in the list of available objects. Now, just choose and required function and provide input parameters.

9.png

11) Note that for some reason, Data Services doesn't recognizes DATS data type from SAP. Instead, you have to use as CHAR and do the conversion latter.

6.png

Hence, I am using to_char function to do the conversion to character format.


12) Now, save the Job and Execute. Once completed, check the newly created table in BW system to see the transferred data.

7.png


As this is just an sample, an RFC enabled function module can be designed appropriately to transfer data to any SAP system. The procedure is similar for BAPIs and IDOCs. You just need to provide the required parameters in correct format and it works.

Use Match Transform for Data De-duplication

$
0
0

Many a times we may have to find potential duplicates in the data and correct it so that correct and harmonized data can be transferred to the target system.

During ETL process we might have to find and remove duplicate records to avoid data redundancy in the target system.


Data Services has two powerful transforms that can be used for many scenarios. The Match and Associate transforms under Data Quality.


These 2 transforms in combination can do lot of data quality analysis and take required actions. In this part we will just see how to use Match transform to identify duplicates in address data and eliminate them.


In next tutorial, we shall see how to post correct data back from duplicate record on to the original driver record.

The sample process that I used is demonstrated in below video.

Invoke Webservices Using SAP Data Services 4.2

$
0
0

Sometimes it is required to load data to a system working based on webservices.


For example for a requirement, where the downstream system is Oracle File Based Loader which demands a file from the storage Server as an
input, Web Services will be the preference for most of the users as it can handle multiple files from a single zip /archive file and load to many tables.


We would like to help you understand the simple steps to invoke web services through Data Services.


Steps involved.


  1. Create a Data Store for web services.

            Provide the link of the web services and its credentials as in below sample.

1.jpg


2.     Import the function to WS data store


A web service will usually comprise of many functions. The function which is needed for a particular requirement has to be imported to the
data store created for web services under its functions segment

2.jpg


3.     Create the Job


Create a job which will take care of the following things

3.jpg


The input details required for the web services can be declared as global parameters and prepare the customized columns as per the requirement. The below columns are the required columns for the sample given.


4.jpg


Create a nested /unnested column structure which is equivalent to the web services input data structure.


5.jpg


In order, to get the column structure of the web services, do the below steps.


Right click on the output schema -> New Function Call -> Select the Web services Data Store -> Select the web services function from the list which you need to invoke.


6.jpg

7.jpg


Drag and drop or key in the Input Schema name to the text box in the Input parameter Definition pop up


The success or failure of the function call can be verified using the return codes of the web services function. According to the error handling design you can divert the results to error tables.


8.jpg


Default return code for a successful web service call is 0.

How to Create System Configuration in BODS

$
0
0

Why do we need to have system configuration at first place? Well, the advantage of having system configuration is that you can use it for the lifetime in a project. In general all projects have multiple environments to load the data when project progresses over the period of time. Examples are DEV, Quality and Production Environments.


There are two ways to execute your Jobs in multiple environments:

  • Edit the Datastore’s configuration manually for  executing Jobs in different environment and default it to latest environment
  • Create the system configuration one time and select the appropriate environment while executing of the Job from the ‘Execution Properties’ window. We are going to discuss this option in this blog.


Followings are the steps to create system configuration in BODS.


Prerequisite to setup the System Configuration:

  • You need to have at least two configurations ready in any of your datastores pointing to two different databases. For example, one for staged data and another for target data. This can be done easily by editing the datastore. Right click the datastore and select ‘Edit’.


Step 1: Execute any of the existing Job to check if your repository does not have any system configuration already created. Below dialog box shall appear once you execute any Job. Do not click on the OK Button to execute. This is just to check the execution properties.


If you look at the below dialog box, there is no system configuration to select.


1.png

Step 2:

Cancel the above Job execution and Click on the Tool menu bar as shown below and select System Configurations.

2.png


Step 3: You can see the below dialog box now. Click on the icon (red circle) as shown in the below dialog box to ‘Create New Configuration’. This dialog box will show all the data stores available in your repository.

3.png

Step 4: Once clicked on the above button it will show the below dialog box with default config details for all datastores. Now you can rename the system config name (by default it is System_Config_1, System_Config_1 etc. ).


Select an appropriate configuration Name against each data stores for your system config. I have taken the DEV and History DB as an example for configuration.  Note that these configs should be available in your datastores.


See the below dialog box how it is selected. You can create more than one configuration (Say it one for DEV, another for History).


Once done, click the OK Button. Now your system configuration is ready to use.


4.png

Step 5: Now execute the any of the existing Job again. You can see System Configuration added to the 'Execution Properties' Window which was not available before. From the drop down list you can select appropriate environment to execute your Job.


5.png

Do let me know if you find it useful. Feel free to revert in case you face any issue while configuring. Hope this helps.


Short Description on Management Console data services

$
0
0

Management Console

The Management Console is a collection of Web-based applications for administering SAP BusinessObjects Data Services jobs and services, viewing object relationships, evaluating job execution performance and data validity, and generating data quality reports.


In Management console we have following option:


Administrator

Manage your production environment including batch job execution, real-time services, Web services, adapter instances, server groups, central and profiler repositories, and more.

Auto Documentation

View, analyze, and print graphical representations of all objects as depicted in the Data Services Designer including their relationships, properties, and more.

Impact and Lineage Analysis

Analyze the end-to-end impact and lineage for Data Services tables and columns and SAP BusinessObjects Enterprise objects such as universes, business views, and reports.

Impact and Lineage Analysis Reports

The Impact and Lineage Analysis application provides a simple, graphical, and intuitive way to view and navigate through various dependencies between objects.

Impact and lineage analysis allows you to identify which objects will be affected if you change or remove other connected objects.

For example for impact analysis, a typical question might be, If I drop the source column Region from this table, which targets will be affected?

For lineage analysis, the question might be, Where does the data come from that populates the Customer_ID column in this target?

In addition to the objects in your datastores, impact and lineage analysis allows you to view the connections to other objects including universes, classes and objects, Business Views, Business Elements and Fields, and reports (Crystal Reports, SAP BusinessObjects Desktop Intelligence documents, and SAP BusinessObjects Web Intelligence documents).

Operational Dashboards

View dashboards of Data Services job execution statistics to see at a glance the status and performance of job executions for one or more repositories over a given time period.

Data Validation Dashboards

Evaluate the reliability of your target data based on the validation rules you created in your Data Services batch jobs to quickly review, assess, and identify potential inconsistencies or errors in source data. Or

Data Validation Dashboard Reports—Provide feedback that allows business users to quickly review, assess, and identify potential inconsistencies or errors in source data.

Data Quality Reports

View and export reports for batch and real-time jobs such as job summaries and data quality transform-specific reports.

Tips on performance Optimization in Data service

$
0
0

Source Database


Tune your database on the source side to perform SELECTs as quickly as possible.

In the database layer, you can improve the performance of SELECTs in several ways, such as the following:

  • Create indexes on appropriate columns, based on your data flows.
  • Increase the size of each I/O from the database server to match the OS read-ahead I/O size.
  • Increase the size of the shared buffer to allow more data to be cached in the database server.
  • Cache tables that are small enough to fit in the shared buffer. For example, if jobs access the same piece of data on a database server, then cache that data. Caching data on database servers will reduce the number of I/O operations and speed up access to database tables.

  Target Database 


Tune your database on the target side to perform INSERTs and UPDATES as quickly as possible.

In the database layer, there are several ways to improve the performance of these operations.

Here are some examples from Oracle:

  • Turn off archive logging
  • Turn off redo logging for all tables
  • Tune rollback segments for better performance
  • Place redo log files and data files on a raw device if possible
  • Increase the size of the shared buffer

  Network 


When reading and writing data involves going through your network, its ability to efficiently move large amounts of data with minimal overhead is very important. Do not underestimate the importance of network tuning (even if you have a very fast network with lots of bandwidth).

Set network buffers to reduce the number of round trips to the database servers across the network. For example, adjust the size of the network buffer in the database client so that each client request completely fills a small number of network packets.


Job server OS


SAP Business Objects Data Services jobs are multi-threaded applications. Typically a single data flow in a job initiates one al_engine process that in turn initiates at least 4 threads.

For maximum performance benefits:

  • Consider a design that will run one al_engine process per CPU at a time.
  • Tune the Job Server OS so that threads spread to all available CPUs.

  Tuning Jobs 


You can tune job execution options after:

  • Tuning the database and operating system on the source and the target computers
  • Adjusting the size of the network buffer
  • Your data flow design seems optimal

  You can tune the following execution options to improve the performance of your jobs:  

  • Monitor sample rate
  • Collect statistics for optimization and Use collected statistics

Quick Tips for Job Performance Optimization in BODS

$
0
0
  • Ensure that most of the dataflows are optimized. Maximize the push-down operations to the database as much as possible. You can check the optimized SQL using below option inside a dataflow. SQL should start with INSERT INTO……SELECT statements.....

1.png

  • Split complex logics in a single dataflow into multiple dataflows if possible. This would be much easier to maintain in future as well as most of the dataflows can be pushed down.


  • If full pushdown is not possible in a dataflow then enable Bulk Loader on the target table. Double click the target table to enable to bulk loader as shown in below diagram. Bulk loader is much faster than using direct load.


2.png 

  • Right click the Datastore. Select Edit and then go to Advanced Option and then Edit it. Change the Ifthenelse Support to ‘Yes’. Note that by default this is set to ‘No’ in BODS. This will push down all the decode and ifthenelse functions used in the Job.

3.png


  • Index Creation on Key Columns: If you are joining more than one tables then ensure that Tables have indexes created on the columns used in where clause. This drastically improves the performance. Define primary keys while creating the target tables in DS. In most of the databases indexes are created automatically if you define the keys in your Query Transforms. Therefore, define primary keys in query transforms itself when you first create the target table. This way you can avoid manual index creation on a table.


  • Select Distinct: In BODS ‘Select Distinct’ is not pushed down. This can be pushed down only in case you are checking the ‘Select Distinct’ option just before the target table. So if you require to use select distinct then use it in the last query transform.


  • Order By and Group By are not pushed down in BODS. This can be pushed down only in case you have single Query Transform in a dataflow.


  • Avoid data type conversions as it prevents full push down. Validate the dataflow and ensure there are no warnings.


  • Parallel Execution of Dataflows or WorkFlows: Ensure that workflows and dataflows are not executing in sequence unnecessarily. Make it parallel execution wherever possible.


  • Avoid parallel execution of Query Transforms in a dataflow as it prevents full pushdown. If same set of data required from a source table then use another instance of the same Table as source.


  • Join Rank: Assign higher Join Rank value to the larger table. Open the Query Editor where tables are joined. In below diagram first table has millions of records so have assigned higher join rank than second table. This improves performance.


5.png

  • Database links and linked datastores: Create database links if you are using more than one database for source and target tables (multiple datastores) or in case using different database servers. You can refer my another article on how to create the DB Link.  Click URL


  • Use of Joining in place of Lookup Functions: Use Lookup table as a source table and set as an outer join in dataflow instead of using lookup functions. This technique has advantage over the lookup functions as it pushes the execution of the join down to the underlying database. Also, it is much easier to maintain the dataflow.


Hope this will be useful.

Some cool options in BODS

$
0
0

I find couple of cool options in BODS and used to apply in almost all the projects I have been doing. You may also give a try if not done yet. Hope you would like these. You can see all these options in designer.


Monitor Sample Rate:

Right Click the Job >  Click on Properties>  Then click on Execution Options


You can change this value of monitor sample rate here and every time when you execute the Job it shall take the latest value set.


Setting this value to a higher number has performance improvement as well as every time you need not to enter this value while executing the Job. The frequency that the Monitor log refreshes the statistics is based on this Monitor sample rate. With a higher Monitor sample rate, Data Services collects more data before calling the operating system to open the file, and performance improves. Increase Monitor sample rate to reduce the number of calls to the operating system to write to the log file. Default value is set to 5.  Maximum value you can set is 64000.


Refer the below screen shot for reference.


11.png


Click on the Designer Menu Bar and select Tool > Options (see the diagram below). There are couple of cool options available here which can be used in your project. Note that if you change any option from here,it shall apply to whole environment.


12.png


Once selected Go to:

Designer >General > View data sampling size (rows)

Refer the below screen shot. You can increase this value to a higher number if you want to see more no. of records while viewing the data in BODS. Sample size can be controlled from here.


13.png

Designer >General > Perform complete validation before Job execution

Refer the below screen shot. I prefer this to set from here as I need not to worry about validating the Job manually before executing any Job. If you are testing the Job and there is chance of some syntax errors then I would recommend this to set before hand. This will save some time. Check this option if you want to enable.


13 - Copy.png


Designer >General > Show dialog when job is completed

Refer the screen shot below. This is also one of the cool option available in designer. This option facilitate the program to open a dialog box when Job completes. This way you need not to see the monitor log manually for each Job when it completes. I love this option.

13 - Copy (2).png


Designer >Graphics>

Refer the screen shot below. Using this option you change the line type as per your likes. I personally like Horizontal/Vertical as all transforms looks more clean inside the dataflow. You can also change the color scheme, background etc.


14.png


Designer > Fonts

See the dialog box below. Using this option, you can change the Font Size.


15.png


Do feel free to add to this list if you have come across more cool stuffs in BODS.

Data Services on Linux - Start/Stop Services

$
0
0
This article is relevant if you like to Start/Stop Information Platform services on Linux box.

This article is about operating SAP Data Services on LINUX. This article is relevant/more/ helpful for those who are first timer on LINUX.

This article is written using SAP Services XI 4.1 SP02.


Pls note that this is different from the Start/Stop Data Services Job Server on Linux, which is one of the component of Data Services.

For your reference : - How to Start/Stop Data services Server on LINUX


        This article covers the step by step instructions(with screens wherever its possible) to Start/Stop IPS (information Platform Services) on Linux using Linux Shell Prompt.


Pls note that start/stop IPS services/servers can be done via central Management Console as well. This article does not cover that part of it.

It is always useful to know linux commands to start/stop SIA(server intelligence agent), because restart of all the servers can be dobe graphically but stopping all the servers and starting them after a while can not be achieved graphically means using CMC.

Following are the commands that needs to be performed at LINUX command prompt.

-$ cd /usr/sap/<SID>/businessobjects/sap_bobj

-$ ./ccm.sh -cms servername.unix.domain.com:6400 -username Administrator -password password -authentication secEnterprise

-$ ./ccm.sh -start all

-$./ccm.sh -cms servername.unix.domain.com:6400 -username Administrator -password password -authentication secEnterprise -display


Pls see below for step by step instructions to start/stop IPS Servers.


Step 1:- Login Via Putty,


Input :- Provide hostname


Hit Open.


Type the below command to navigate to the IPS directory where BOE/IPS is installed.

-$ cd /usr/sap/<SID>/businessobjects/sap_bobj

Now, it is possible that you do not have proper privileges to perform below action so pls ensure that you logged in via some sudo access which has authorization to perform below command, generally it is sapds<SID>. it may be different as well.


-$ ./ccm.sh -display -cms Servername.unix.domain.com:6400

Creating session manager...

Logging onto CMS...

err: Error:  Could not log on to CMS (STU00152)

err: Error description: The system Servername.unix.domain.com can be contacted, but there is no Central Management Server running at port 6400.


So logged in with right user and make sure that it has sudo assigned to to it.


Below command will help you to open an authenticated session so that you can perform your activities.


Here we are interested to start all the server components of IPS

-$ ./ccm.sh -cms servername.unix.domain.com:6400 -username Administrator -password password -authentication secEnterprise
-$ ./ccm.sh -start all
Starting all servers...

Starting servername3...

After executing above command you can make sure that all the components are running by using below command. there you need to provide one more parameter to display the components running under that instance (-display)

$ ./ccm.sh -cms servername.unix.marksandspencercate.com:6400 -username Administrator -password password -authentication secEnterprise -display
Creating session manager...
Logging onto CMS...
Creating infostore...
Sending query to get all server objects on the local machine...
Checking server status...

Server Name: servername.CentralManagementServer
     State: Running
     Enabled: Enabled
     Host Name:servername
     PID: 2781
     Description: Central Management Server

Server Name: servername.AdaptiveProcessingServer
     State: Running
     Enabled: Enabled
     Host Name: servername
     PID: 2988
     Description: Adaptive Processing Server

Server Name: servername.OutputFileRepository
     State: Running
     Enabled: Enabled
     Host Name: servername
     PID: 3002
     Description: Output File Repository Server

Server Name: servername.InputFileRepository
     State: Running
     Enabled: Enabled
     Host Name: servername
     PID: 2998
     Description: Input File Repository Server

Server Name: servername.AdaptiveJobServer
     State: Running
     Enabled: Enabled
     Host Name: servername
     PID: 2995
     Description: Adaptive Job Server

Server Name: servername11.CentralManagementServer
     State: Stopped
     Enabled: Enabled
     Host Name:servername
     PID: -
     Description: Central Management Server

Server Name: servername11.AdaptiveProcessingServer
     State: Stopped
     Enabled: Enabled
     Host Name: servername
     PID: -
     Description: Adaptive Processing Server

Server Name: servername11.OutputFileRepository
    State: Stopped
     Enabled: Enabled
     Host Name: servername
     PID: -
     Description: Output File Repository Server

Server Name: servername11.InputFileRepository
     State: Stopped
     Enabled: Enabled
     Host Name: servername
     PID: -
     Description: Input File Repository Server

Server Name: servername11.AdaptiveJobServer
     State: Stopped
     Enabled: Enabled
     Host Name: servername
     PID: -
     Description: Adaptive Job Server

Server Name: servername.EIMAdaptiveProcessingServer
     State: Running
     Enabled: Enabled
     Host Name: servername
     PID: 2992
     Description: EIM Adaptive Processing Server

Server Name: servername11.EIMAdaptiveProcessingServer
     State: Stopped
     Enabled: Enabled
     Host Name: servername
     PID: -
     Description: EIM Adaptive Processing Server                     


In the above output you see that some of the servers are still stopped. This is because I have presented the example of Pre-prod environment where two machines are part of a cluster/Server group because of high availability and performance reasons.


As I have executed the command on one node only, that's why servers from other node are seeing as "Stopped". I will do the similar exercise on other node too.


Now. I will login into CMC and see the server status.


As All servers were stopped so I could not logged into CMC and check the severs. Now both the nodes are up and I am able to logged into the CMC.


CMC >> HOME >> Organize >> Servers


DS_IPS_SERVER_START_STOP_01.JPG


Check all the other status as well, to make sure that there is nothing disabled and stopped.


So lets check the Stopped instances/servers. Click on "Stopped" under "Server Status"


DS_IPS_SERVER_START_STOP_02.JPG


Lets check the "others" under "Server Status"


DS_IPS_SERVER_START_STOP_03.JPG


Now we are confident and say confirm that all the servers are up and running.


Next step is to login to Data Services Designer and check that you are able to login without any difficulty.


DS_IPS_SERVER_START_STOP_04.JPG


1. If you are interested to perform some other server Management (Data Services Application, Job Server) then you may see this article


How to Start/Stop Data services Server on LINUX


Data Services on Linux - Version check of Data Services Components


How to Add Local Repo with Data Services Job Server in LINUX


SAP Data Services on LINUX

Viewing all 236 articles
Browse latest View live


<script src="https://jsc.adskeeper.com/r/s/rssing.com.1596347.js" async> </script>